How To Use Queue Result Settings
The Queue Result Settings in Eagle enables you to control how the result of a requested function should be handled. You can control where the result should be saved and which placeholders the file name should contain. It is possible to specify the settings at several levels and the most specific settings apply.
Step 1: Create a Queue Result Setting
- Choose the search icon (ALT+Q), enter Queue Result Settings, and then choose the related link.
- Select New.
- Enter a Code and a Description.
- Select SharePoint Online (Export) in the Type field or leave empty if you (only) want to save the result to OneDrive or a user's device.
Note
If you use the Spider app, you can select Integration Queue - Spider (Export) in the Type field to use a Communication Method available in Spider. Select an Integration of the Export Data Integration Type in the Integration Setup Code field to export the results of enqueued functions via Spider.
Step 2: Create a File Name Code
The result of requested functions can be downloaded or exported to files and the File Name Code controls the name of the files that are created. This step only applies if you want to change the default file name settings.
- Select New in the File Name Code field on the File Settings FastTab.
- Enter a Code and a Description.
- Select the Add Placeholder action to append a placeholder to the file name or enter placeholders manually on the File Name/Format FastTab.
- Continue to Step 3: Enter Details for SharePoint if you have selected SharePoint Online (Export) in the Type field, otherwise you're done.
Note
Placeholders within { } are dynamic and created by the system. Placeholders without { } are fixed values. See all placeholders that can be created dynamically by the system by selecting the Add Placeholder action and find a short explanation of each placeholder in the Description field.
Tip
See an example of what a file name will be (based on a queue entry) in the File Name (Preview) field on the Preview FastTab. The last requested function is used by default for the preview, but it is possible to change by selecting the link. You can select the Test Setting action to ensure that the format of the file name is valid.
Note
The delimiter between the placeholders is set to _ by default, but it is possible to manually change to something else on the File Name/Format FastTab.
Tip
The fields "File Name Code", "Path Setting" and "Path Code" on the Function Setup page enables users to specify specific settings for a function without creating new Queue Result Settings.
Step 3: Enter Details for SharePoint
This step only applies if SharePoint Online (Export) has been selected in the Type field.
- Enter the full address of the site on which the document library is located in the Site URL field on the SharePoint Online Document Library FastTab.
- Enter the path to the document library located on the site, in the Site Relative URL field.
- Enter the AAD Tenant Id for the SharePoint site or leave the field empty if the SharePoint site is on the same tenant as (the current) Business Central.
Note
Field - Site URL
If the full path to the document library is https://YourDomain.sharepoint.com/sites/SubSite/Documents/SubFolder/ then this field should contain: https://YourDomain.sharepoint.com/sites/SubSite
Field - Site Relative URL
Enter only the path to the document library. Based on the example above, this field should contain: Documents/SubFolder/
Summary of Fields - Site URL & Site Relative URL
Site URL and Site Relative URL should together contain the address of the SharePoint site and document library. Copy both fields and paste into the browser to check that you entered them correctly.
Field - AAD Tenant Id
A Tenant ID (tenant identifier) is a unique identifier or alias for the tenant. Learn how to find your Microsoft 365 tenant ID on Microsoft Learn.
Action - Show Files
You can use the Show Files action to verify that you can access the specified location with the current settings and permissions.
Step 4: Create a Path Code
This step only applies if SharePoint Online (Export) has been selected in the Type field, and you want to use dynamic paths for the results. If you want to use a few folders that are on SharePoint, you can instead add several Queue result settings.
- Select New in the Path Code field on the File Settings FastTab.
- Enter a Code and a Description.
- Select the Add Placeholder action to append a placeholder to the path or enter placeholders manually on the File Name/Format FastTab.
Note
Placeholders within { } are dynamic and created by the system. Placeholders without { } are fixed values. See all placeholders that can be created dynamically by the system by selecting the Add Placeholder action and find a short explanation of each placeholder in the Description field.
Tip
See an example of what a path will be (based on a queue entry) in the File Path (Preview) field on the Preview FastTab. The last requested function is used by default for the preview, but it is possible to change by selecting the link. You can select the Test Setting action to ensure that the format of the path is valid.
Tip
Enable the Autogenerate Folders toggle on the File Settings FastTab to allow missing folders to be created automatically (according to the path settings) when the results of requested functions are exported.
Step 5: Select Queue Result Settings Code
The last step is to specify where the setting should apply.
To specify the setting at the highest level:
- Choose the search icon (ALT+Q), enter Eagle Setup, and then choose the related link.
- Select a Queue Result Settings Code on the General FastTab.
The Queue Result Settings Code can also be specified on the following pages:
- Environments - Eagle
- Settings for My Companies
- Function Groups
- Function Setup.
Note
Choose the level that best suits the purpose. The most specific setting applies.
Advanced File Name/Path Placeholders
Report Filters
Eagle supports other placeholders than those available on the File Name/Path Placeholders page. The below placeholders can be added manually. The parts within quotation marks should be replaced with data from the report request page.
- {EnqueuedReportFilter("DataItemName","Fieldno.")}
- {EnqueuedReportFilterOption("Name")}
The use of these placeholders is to add the requested (enqueued) report's filter in the file name or path.
The filters that can be added to filename and path are those specified on the report request page. Below are a number of examples of how to add some common filters as part of the filename/path.
Examples of filters for report Inventory Valuation ID 1001:
| Report Field | Filter | Field No. | Placeholder |
|---|---|---|---|
| Starting Date | Option | N/A | {EnqueuedReportFilterOption(StartDate)} |
| Ending Date | Option | N/A | {EnqueuedReportFilterOption(EndDate)} |
| Inventory Posting Group | Item | 11 | {EnqueuedReportFilter(Item,11)} |
Examples of filters for report Sales Statistics ID 112:
| Report Field | Filter | Field No. | Placeholder |
|---|---|---|---|
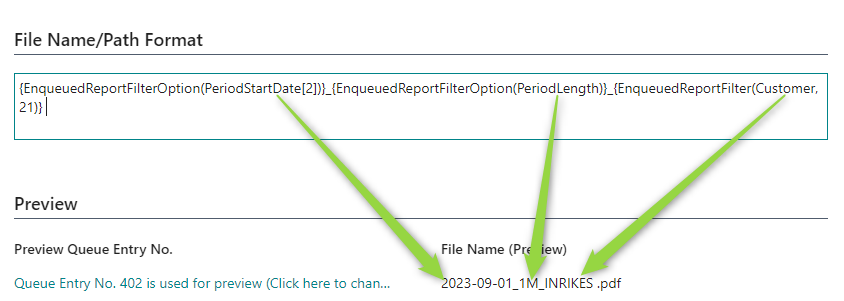
| Starting Date | Option | N/A | {EnqueuedReportFilterOption(PeriodStartDate[2])} |
| Period Length | Option | N/A | {EnqueuedReportFilterOption(PeriodLength)} |
| Customer Posting Group | Customer | 21 | {EnqueuedReportFilter(Customer,21)} |
Tip
To use the above placeholders, enter the entire placeholder in the field on the File Name/Path Format FastTab on the File Name/Path Settings page.
Example of entered placeholders on the File Name/Path Settings page:

Find Report Parameters
You can use a feature in the Smart Toolbox app to find the report parameters to use in the placeholders.
Smart Toolbox is installed by default when you use Eagle.
Follow these steps to show the Request Page XML when filters are set:
- Choose the search icon (ALT+Q), enter Smart Toolbox, and then choose the related link.
- Enable the Debug Mode Active toggle on the Smart Toolbox page.
- Select the Debug Flags action.
- Select the line with the Name Request Page Xml and then select the Activate Selected action.
- Close the page.
- Choose the search icon (ALT+Q), enter Function Setup, and then choose the related link.
- Select the Report that you have set up with filters, and then select the Filters action.
- Select OK on the Request Page.
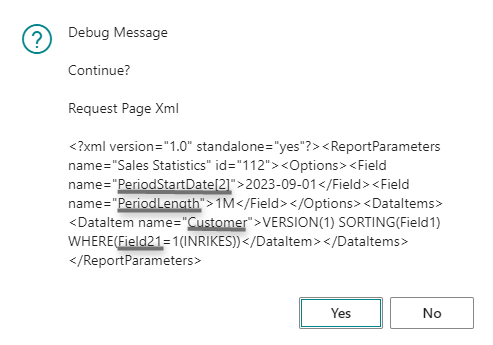
- A Debug Message is displayed with the Request Page XML.
- Find and copy the relevant parameters.
Example of debug message for report Sales Statistics ID 112:

Note
Disable the Debug Mode Active toggle on the Smart Toolbox page to end debug mode.
Metadata Codes
The metadata for requested functions can be used as part of filename/path.
The metadata tags are added in two steps:
Step 1: Select Queue Metadata
- Choose the search icon (ALT+Q), enter File Name/Path Settings, and then choose the related link.
- Select the Add Placeholder action.
- Select one of the Queue Metadata lines and the select OK.
Step 2: Enter a Metadata Code
Enter the metadata code you want to add by entering one of the codes found in the table below.
The following Metadata Codes are supported:
| Code | Description |
|---|---|
| AttachmentType | How the file was attached |
| CreatedAt | The system date of when the record was created |
| DocumentDate | The date a user has specified as the created date |
| DocumentNo | The document/voucher number |
| DocumentType | The type of the document |
| OriginalFileName | The original name of the file |
| PostingDate | The accounting date |
Tip
Enter for example placeholder {QueueMetadata(PostingDate)} to add the accounting date as part of the filename or path.
Note
Metadata codes are only applicable if the requested function supports metadata.
Transformation Rules
It is possible to apply a Transformation Rule to a File Name/Path placeholders to transform the value of a placeholder. This can be useful for changing a text or date to the format you desire.
- Select the Placeholder to transform on the File Name/Path Format FastTab.
- Add a Pipe (|) at the end of the placeholder (to transform) and enter the Code of the Transformation Rule.
Note
For example, if you want to change placeholder {Description} to uppercase, then add a transformation rule with Transformation Type Uppercase. If the Code of the transformation rule is "UPPERCASE" then enter: {Description|UPPERCASE}
Tip
Read more about which transformation rules are available on Microsoft Learn.
See Also
How To Perform Operational Tasks
How To Use Date Filter
How To Use User-defined KPIs
How To Overview